Combatant by Complified Creations
How to Design the Best 150 Gram Combat Robot

Materials
The entire list of required materials for your specific project will differ from this, but this will provide a baseline for what components to look for.
- TPU 95A 3D Printer Filament
- 3D Printer Filament
- Laser Cut Steel (for weapons and forks)
- Malenki Nano
- 2-cell battery(between 200 and 300 mAh)
- 2 x N-10 Drive Motors
- Hub-mounted Weapon Motor
- Single Channel AM32 ESC
- EVA Foam
- Liquid Latex
- Antonio Meggiolaro, Marco. “RioBotz Combat Tutorial.” RioBotz, 2009, https://www.riobotz.com/riobotz-combot-tutorial. Accessed 15 Oct 2025.
- Damao. “Understanding EVA Foam Density & Hardness: Shore A/C Explained.” Damao, 23 May 2025, https://damao-tech.com/understanding-eva-foam-density-hardness-shore-a-c-explained/. Accessed 26 Oct 2025.
- De La Rosa, Sergio, et al. “Design of Flexible TPU-Based Lattice Structures for 3D Printing: A Comparative Analysis of Open-Cell Versus Closed-Cell Topologies.” Polymers, May 2025, https://research.ebsco.com/c/7opzif/search/details/sifiuctqhj?db=a9h&limiters=None&q=Battle%20Bot%20OR%20Vertical%20Spinner%20OR%20Drum%20Spinner%20OR%20Horizontal%20Spinner %20OR%20Under%20Cutter%20OR%20Melty%20Brain%20OR%20Shell% 20Spinner%20OR%20Ring%20Sp. Accessed 1 Oct 2025.
- ITGresa. “Malenki Nano Dual ESC and Receiver.” ITGresa, N/A, https://itgresa.com/product/malenki-nano-dual-esc-and-receiver/?srsltid=AfmBOoqSivLx7QIzSms4f-ra6CApjKfbj2LACBDTT61efA2-vXjrQuM1. Accessed 26 Oct 2025.
- ITGresa. “Turnabot High Power N10 Motors.” ITGresa, N/A, https://itgresa.com/product/turnabot-high-power-n10-motors/?srsltid=AfmBOoqOhF7vH6j_xGlk5ibc431rAYamZSmoSzFZx4BTg_4mgba0-Wf7. Accessed 26 Oct 2025.
- Maker's Muse. “A Combat Robot Weapon that NEVER STOPS SPINNING.” YouTube, 7 November 2024, https://www.youtube.com/watch?v=lU2H8Nscy-A. Accessed 26 Oct 2025.
- Matter Hackers. “5 Materials that are Perfect for 3D Printing Combat Robots.” Matter Hackers, 2023, https://www.matterhackers.com/articles/5-materials-that-are-perfect-for-3d-printing-combat-robots?srsltid=AfmBOopvt5zgVmbr0rLz7R-SUARLpkjCuR_2BH56GOLvqFTxDSh7mdsF. Accessed 26 Oct 2025.
- NA. “What are the Key Ingredients for a Competitive Combat Robot?” RoboJackets Wiki, 9 April 2022, https://engineerdog.com/2018/06/03/what-are-the-key-ingredients-for-a-competitive-combat-robot/. Accessed 8 Oct 2025.
- Repeat Robotics. “Flysky FS2A Receiver – Repeat Robotics.” Repeat Robotics, N/A, https://repeat-robotics.com/buy/flysky-fs2a-receiver/. Accessed 26 Oct 2025.
- Team Cryptid Robotics. “7 Things I Wish I Knew Before Building My First Robot.” Youtube, September 2025, https://www.youtube.com/watch?v=SRdnLfyvxsU. Accessed 8 Oct 2025.
- Team Just 'Cuz Robotics. “Combat Robotics Basics: Spinner System Design.” Youtube, 2024, https://www.youtube.com/watch?v=uQZUa15e-mk&t=33s. Accessed 8 Oct 2025.
- The Organic Chemistry Tutor. “Introduction to Inclined Planes.” YouTube, 18 February 2021, https://www.youtube.com/watch?v=ufgY237M5KQ. Accessed 25 Oct 2025.
Weapon
Figure 1
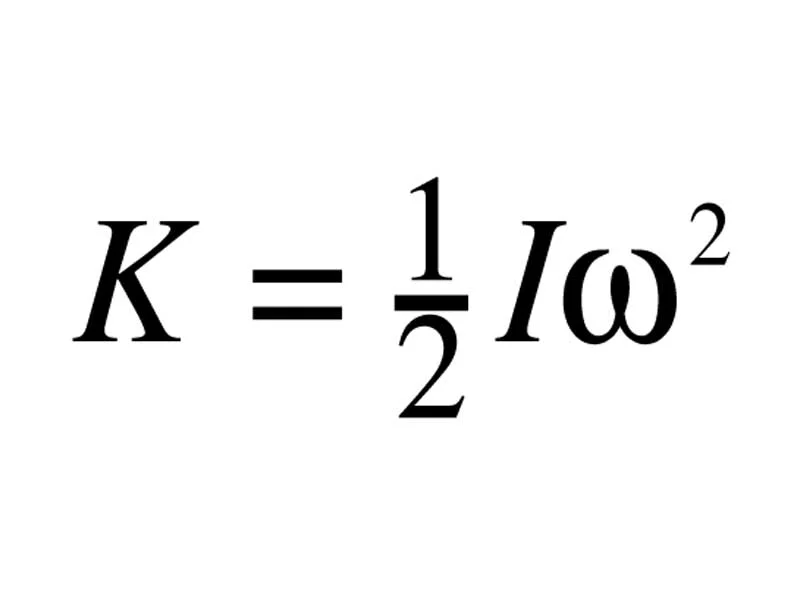
Figure 2

Arguably, the most essential part of a combat robot is the weapon: it's the only way to do damage to the opponent and provides the most points in the event of a judge's decision. The best of these weapon designs is a vertical disk spinner with a hollow core and a 5-10 mm bite.
The reason you want the disk hollowed out on the inside is to maximize the kinetic energy of every hit and thus the potential damage your robot can deal. This is a result of the formula for the kinetic energy of a spinning mass(see Figure 1) and the formula for the moment of Inertia(MOI)(see Figure 2). Because the radius is squared and the mass is simply to the power of one, that means that having a lighter mass at a farther distance will provide more energy than a heavy mass concentrated on the inside. This is why the shape of your spinner should be hollowed out(see Figure 3). This is further supported by Team Just ‘Cuz Robotics' video Combat Robotics Basics: Spinner System Design, where he says that “kinetic energy is simply a factor of how much energy is stored in the blade as it is spinning, and that is determined … by a function of the shape of the weapon known as the moment of inertia, or MOI [and] the MOI of a weapon is basically the average position of mass away from the center” (Team Just 'Cuz Robotics 2024).
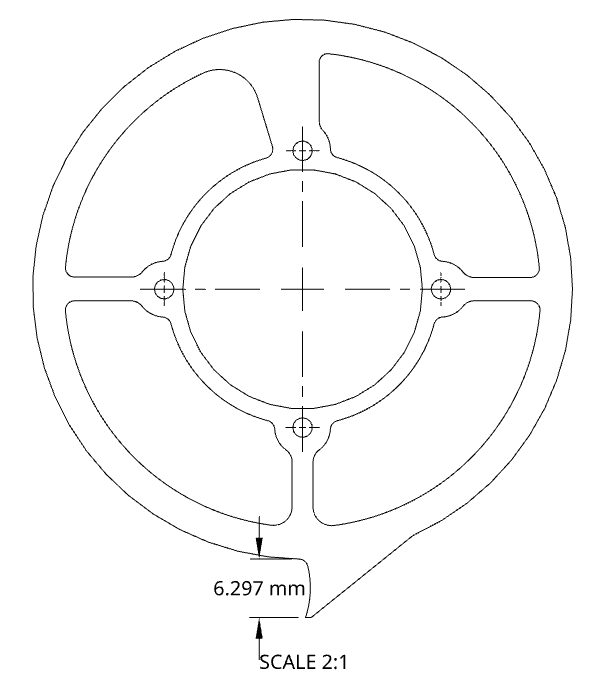
The next step in designing your robot's weapon is defining the amount of bite you want. The bite of the weapon is the maximum insertion that the tooth can reach into your opponent's robot, usually just the tooth height, but it can be less. To see a good example of what a good amount of bite looks like, see Figure 3. The calculation for the tooth's bite is perfectly explained in Marco Antonio Meggiolaro’s paper Riobotz Combat Tutorial, where he explained that “both robots would approach each other by dmax = (vx1+vx2)⋅∆t = (vx1+vx2)⋅π/ωb. So, the tooth bite could reach values up to dmax” (Meggiolaro 2009). Given that the average robot moves at 2.5 mph and has a weapon speed of 4000 RPM, we can calculate that the maximum insertion will be 13.4 millimeters. For a small robot like we are making, 13mm of bite is pretty unreasonable, so we find that a good value for a bite on a 150 is about 10mm with some wiggle room up or down of about 5mm.
Figure 3
| Spin: RPM | Bite: mm |
| Teeth: # | |
| Speed: mph |
Armor
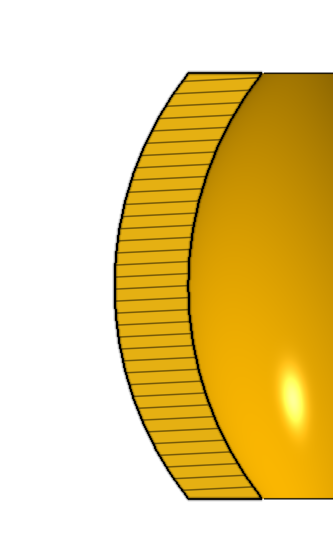
Figure 4
Next to the weapon, your robot's armor is one of the most critical parts of a combat robot, because fights are scored (5 points for damage, 3 for control, and 3 for aggression). As a result of this scoring and the need for your robot to survive if you want to win in a KO situation, the armor is one of the most important parts of the robot, and the construction of it is vital to having a winning chance. The best way to design this armor is to make it from TPU with a curved exterior and, where needed, closed-cell infill for lighter, but slightly less durable, armor.
TPU is the best choice for the material of the armor due to its superior impact absorption, durability, and layer bonding compared to almost every other 3D printer filament. Combining the relatively cheap cost of TPU with those attributes, it is the obvious choice for your robot's armor. This is shown by MatterHackers, a 3D printer filament company, when they describe how “TPU is a flexible, highly durable filament that's perfect for parts that need to bend or flex without breaking. This makes it an excellent choice for shock absorption components in combat robots or parts needed to withstand high stress. TPU is also resistant to abrasion, wear, and tear, adding to its longevity” (Matter Hackers 2023). Due to its durability, TPU can withstand the high-stress scenarios of a fight. Adding a curved surface (see Figure 4) further increases its durability by providing a more rigid shape to reduce bending and thus stresses on the armor, as well as giving a sloped surface for the opponent's weapon to slip off.
The infill of the armor can also be extremely important for both meeting the weight requirement and adding armor thickness where necessary (see Figure 6). This infill can be categorized into three types: open cell, closed cell, or other. Other infill types are generally used only in specific circumstances, so when printing parts for your robot, it is usually best to use either closed-cell or open-cell foam. Of the two remaining geometries, Sergio De La Rosa’s article Design of Flexible TPU-Based Lattice Structures for 3D Printing: A Comparative Analysis of Open-Cell Versus Closed-Cell Topologies excellently explains the “substantial differences in the manufacturability of the topologies, with open-cell structures exhibiting more pronounced defects. Additionally, the unit cell size and the resulting density of the samples were found to provide design advantages, as closed-cell topologies demonstrated superior load resistance” (De La Rosa 2025). Because of the superior strength of closed-cell topologies, it is better to use such infills in the armor and other parts. A good infill pattern to accomplish this (and what your robot should be printed in) is cubic (see Figure 5).
With all that said, it is still wise to try to minimize infill in the armor as much as possible because it decreases the strength of that section of armor, which, while it might be getting directly hit, will be taking the resulting forces from other sections that are getting hit. That's all, to say: design your robot to minimize the amount of infill needed in almost all cases.
Figure 5

Figure 6

Forks
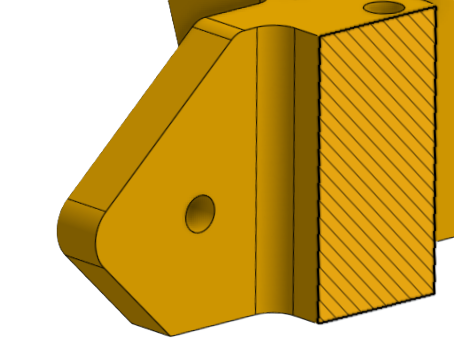
Figure 7
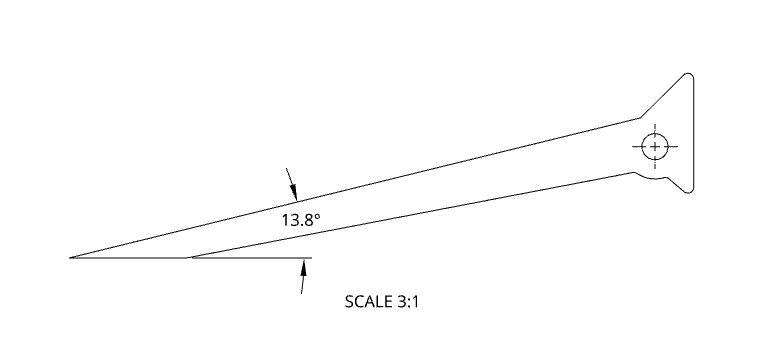
Figure 8
Including forks on your combat robot will allow you to increase significantly both your control over the match and the other robot, as well as provide you with a better angle to be able to deal more damage to the opponent's robot. Forks can lift your opponent further off the ground and give your weapon a better chance at making good contact with the opponent robot by exposing their underside for your weapon to hit. This allows the weight of the opponent robot to counteract the force of your weapon better and allow your weapon to dig deeper, thus doing more damage.
Using forks at a relatively low angle to the ground will provide optimal geometry. This is excellently explained in The Organic Chemistry Tutor’s video Introduction to Inclined Planes, where he shows that the formula for the acceleration of a block down an inclined plane is “g*sinθ,” with theta being the angle between the ground and the surface of the inclined plane. This means that the force required to push a mass up the inclined plane is at least m*g*sinθ. This means that, for a given mass (150 grams), it will get easier and easier to push them up the slope, fork, as the angle relative to the ground decreases. This ease of movement means you will have a easier time getting the opponent onto your forks and thus getting good hits. A good fork geometry also includes a pivot point to give you the best chance of getting under your opponent as much as possible (see Figure 7).
When adding forks to your robot, you should also make sure to limit their movement, as it can cause many unforeseen problems if they’re not. This is explained in Team Cryptid Robotics’ video 7 Things I Wish I Knew Before Building My First Robot, where they say that “if they can rotate too far downwards, that's a pretty good way to end up high-centering your robot, [and] … if they rotate upwards too much … [then] they are basically not doing anything” (Team Cryptid Robotics 2025). When you high-center your robot, you are more likely than not out of that round, because it almost entirely prevents you from driving your robot in any controlled manner and often results in you being counted out and eliminated for not moving. When the forks go too high, then they do nothing and become a waste of weight. A good range of motion for your forks is about 30-45 degrees.
Limiting your forks might sound like a daunting task, but it simply entails adding a larger flat portion to the back of your fork and a flat or angled area to your mounting point on the frame(see Figures 7 and 8). When limiting your forks, ensure they will never pass under the robot or cross the vertical plane in either direction. This will almost ensure that your forks will stay where they should. Lastly, consider TPU's flexibility in your design and add extra room for wiggling to keep the fork in its correct position.
Electronics
The electronics selection for your robot is extremely important to its functionality and overall performance. Without properly selected electronics, you can burn out a motor, ESC, or even your receiver. Choosing the right electronics can be the difference between losing because your drive motors die and winning because they refuse to give up, no matter the damage. A good electronics selection for your 150 gram would be a Malenki Nano, a 2-cell battery of 200-300 mAh, and an AM32 weapon motor ESC.
The Malenki Nano is the best choice for any 150-gram, no matter the weapon or drive variety, for one simple reason: it only weighs 2.6 grams according to ITGresa, an online parts retailer. When compared to other popular receivers, like the Flysky FS2A, which also weigh about 2 grams but don't have two integrated DC motor ESCs and three servo controllers, the actual weight to get an equivalent to the Malenki Nano would be upwards of 10 grams (including ESCs and other electronics). The Malenki Nano provides a three-in-one functionality while being lighter than most standalone receivers and should be the pick for your project.
Using a two cell battery for your 150 gram combat robot is optimal because the normal 150 gram robot will only need two cells to spin the weapon motor up to an appropriate speed because they are usually around 2,000 kV meaning that with a two cell battery, about 7.4 operating voltage, the weapon has a theoretical max speed of almost 15,000 RPM, but taking into account air resistance as well as other factors, this dips down to about 6,000 RPM. 6,000 RPM is more than enough speed for your robot to deal excellent damage. The battery you purchase should also be between 200 and 300 mAh because, from my own experience, I have found this to be enough to leave your battery at about 30% by the end of the fight as long as the weapon isn't full-throttled the whole time, which is the recommended minimum charge for a LiPo battery.
Motors
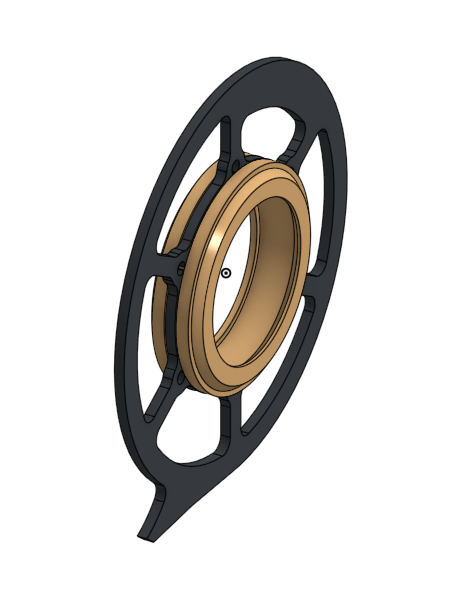
Figure 9
Selecting the correct motors for your combat robot is extremely important to getting a robot that drives well and hits hard. Using 2 Turnabout N-10 motors for the drivetrain and a brushless hub-mounted weapon motor of about 2,000 kV (see the link above for my personal pick) works exceptionally well for a combat robot.
A high-gear-ratio n-10 motor usually only weighs about eight to ten grams according to ITGresa, and it provides more than enough torque to shove around 150-gram robots from what I have seen in my years in the sport. Compared to most other drive motor options, it offers a superior strength-to-weight ratio and should be used in your robot.
Using a brushless hub motor is optimal for the 150 gram robot because it minimizes the weight by getting rid of a lot of mounting hardware and doesn't have the downside of hubmotors in big weight classes because the 150s don't do enough damage to destroy the hub motor like it might in larger weight classes. Hub motors do not have to be dedicated to that purpose from the factory. They can be made by mounting the weapon directly to a simple outrunner brushless motor, or by using a spacer to safely connect the weapon to the motor. Maker’s Muse explains the advantages of this in his video A Combat Robot Weapon that NEVER STOPS SPINNING, saying that they “are phenomenally powerful for their size and weight” (Maker’s Muse 2024). This superior strength-to-weight ratio is what makes them the best choice for 150 robots.
Mounting the hub motor onto the weapon can be extremely challenging to figure out without interfering with the weapon's windings and maintaining its lightness advantage. The easiest way to mount them together is to simply press-fit them together so they won’t come apart. However, if you choose to create a weapon from a thin material, such as 3/32-inch steel, it is much stronger to design a washer to hold them together. Figure 9 depicts the washer and how it mounts the weapon to the motor for reference when designing your robot.
Drive Train
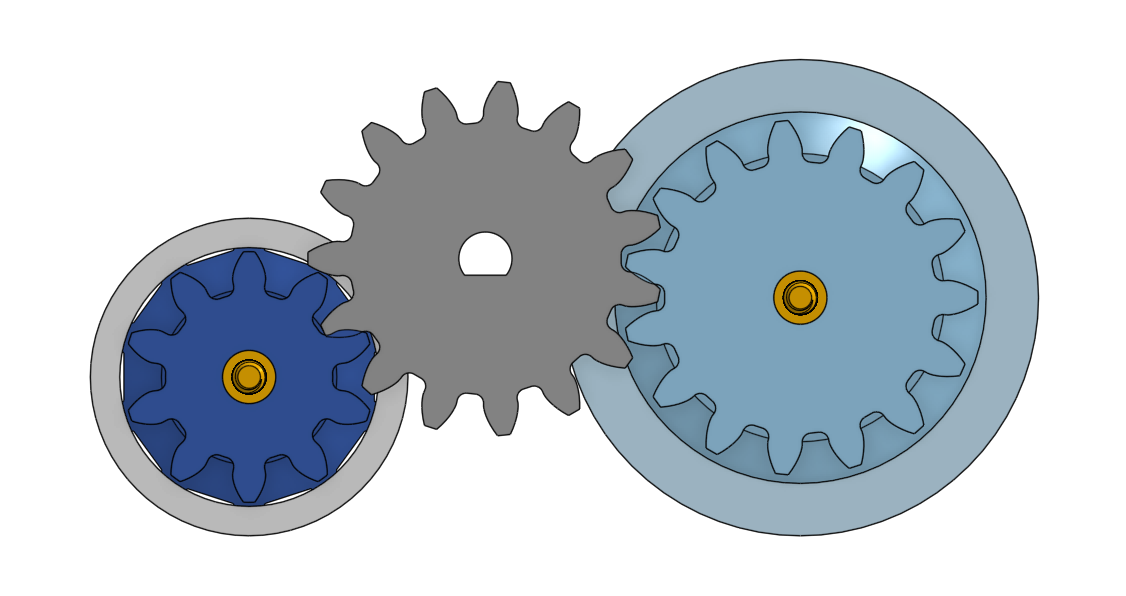
Figure 10
Choosing the appropriate drive train and components is extremely important to having a reliable robot that can control the match. Using a geared drivetrain with foam wheels coated in latex provides the best reliability, least weight, and best traction for your combat robot.
Using Eva foam wheels for your combat robot provides the best weight distribution while still providing more than enough traction, thanks to the thin layer of latex. In the community, it is generally a choice between LEGO tires and foam wheels because the LEGO tires are very easy to use, you just buy and mount them, but the LEGO tires can weigh up to about 2 grams whereas the foam wheel will generally weigh only 1 gram with the latex and will have the same if not better traction thanks to the latex. This is further supported by Damao’s article Understanding EVA Foam Density & Hardness: Shore A/C. Explained where they state that high-density EVA foam, the most popular choice of foam for combat robotics, has a density of “150–280 kg/m³ [and that it is] stronger and more rigid” (Damao 2025). Considering that the average tire on a 150-gram combat robot is only about a half inch in diameter and three-eighths of an inch thick, that means that it only has a volume of 4.8 * 10^-6 m^3 and a mass of only about 1 gram. Combining this low weight with the grippyness of the latex, it becomes obvious why foam wheels should be the choice for your robot.
A geared drivetrain is the obvious pick for your combat robot because of the simple fact that combat robots need to be extreme to survive getting wailed on for 3 minutes straight and for multiple rounds at a time. Compared to other options, such as belts, gears are the best choice due to their reliability. Gears don't carry the risk of snapping, stretching, or flipping when your robot gets hit, as a belt would. Gears are also much easier to replace due to their printed nature; belts have to be bought beforehand, but 3D-printed gears can be made in bulk in the event of a snap. This increased reliability and ease of manufacture and replacement clearly place gears above all other drivetrains for 150-gram robots.
A sample design for a geared drive train is shown in Figure 10.